- 打开配置文件
notepad $PROFILE如果提示文件找不到,可以先创建
New-Item -Path $PROFILE -Type File -Force - 在配置文件中,添加自动切换目录的命令
Set-Location "C:\Your\Desired\Path"或者
cd "C:\Your\Desired\Path" - 设置带参数的命令别名
function grep { Select-String $args }
Set-Alias grep grep
docker镜像本地保存和加载
保存镜像
Docker 镜像不能直接下载为独立的文件,但可以通过以下两种方式获得镜像文件:
1. docker save 命令
docker save 命令可以将一个或多个镜像保存为一个 tar 归档文件。
docker save -o <filename.tar> <image_name>
例如,将 ubuntu:latest 镜像保存为 ubuntu.tar 文件:
docker save -o ubuntu.tar ubuntu:latest
这个 tar 文件包含了镜像的所有层和元数据,可以用于在其他机器上加载镜像。
2. docker export 命令
docker export 命令可以将一个容器的文件系统导出为一个 tar 归档文件。
docker export -o <filename.tar> <container_id>
例如,将 ID 为 c7e2b70d04ae 的容器导出为 container.tar 文件:
docker export -o container.tar c7e2b70d04ae
区别:
- docker save 保存的是镜像,包含镜像的所有历史记录和层。
- docker export 保存的是容器,只包含容器当前的文件系统。
加载镜像:
可以使用 docker load 命令将保存的镜像文件加载到 Docker 中:
docker load -i <filename.tar>
一些额外的说明:
- docker save 和 docker export 导出的文件都比较大,传输时需要注意网络带宽。
- 导出的文件可以在没有 Docker 环境的机器上解压缩,但不能直接运行。
- 建议使用 docker save 保存镜像,因为它保留了镜像的完整信息。
国内安装docker服务
Docker 提供了一个自动配置与安装的脚本,支持 Debian、RHEL、SUSE 系列及衍生系统的安装。请注意,Docker 官方不建议在生产环境使用此脚本安装 Docker CE。以下方法使用清华镜像安装 docker 服务。
以下内容假定:
您为 root 用户,或有 sudo 权限,或知道 root 密码;
您系统上有 curl 或 wget
export DOWNLOAD_URL="https://mirrors.tuna.tsinghua.edu.cn/docker-ce"
如您使用 curl
curl -fsSL https://raw.githubusercontent.com/docker/docker-install/master/install.sh | sh
如您使用 wget
wget -O- https://raw.githubusercontent.com/docker/docker-install/master/install.sh | sh
给docker配置 HTTP/HTTPS 网络代理
使用Docker的过程中,因为网络原因,通常需要使用 HTTP/HTTPS 代理来加速镜像拉取、构建和使用。下面是常见的三种场景。
为 dockerd 设置网络代理
"docker pull" 命令是由 dockerd 守护进程执行。而 dockerd 守护进程是由 systemd 管理。因此,如果需要在执行 "docker pull" 命令时使用 HTTP/HTTPS 代理,需要通过 systemd 配置。
为 dockerd 创建配置文件夹。
sudo mkdir -p /etc/systemd/system/docker.service.d
为 dockerd 创建 HTTP/HTTPS 网络代理的配置文件,文件路径是 /etc/systemd/system/docker.service.d/http-proxy.conf 。并在该文件中添加相关环境变量。
[Service]
Environment="HTTP_PROXY=http://proxy.example.com:8080/"
Environment="HTTPS_PROXY=http://proxy.example.com:8080/"
Environment="NO_PROXY=localhost,127.0.0.1,.example.com"
刷新配置并重启 docker 服务。
sudo systemctl daemon-reload
sudo systemctl restart docker
为 docker 容器设置网络代理
在容器运行阶段,如果需要使用 HTTP/HTTPS 代理,可以通过更改 docker 客户端配置,或者指定环境变量的方式。
更改 docker 客户端配置:创建或更改 ~/.docker/config.json,并在该文件中添加相关配置。
{
 "proxies":
 {
   "default":
   {
     "httpProxy": "http://proxy.example.com:8080/",
     "httpsProxy": "http://proxy.example.com:8080/",
     "noProxy": "localhost,127.0.0.1,.example.com"
   }
 }
}
指定环境变量:运行 "docker run" 命令时,指定相关环境变量。
环境变量
docker run 示例
HTTP_PROXY
--env HTTP_PROXY="http://proxy.example.com:8080/"
HTTPS_PROXY
--env HTTPS_PROXY="http://proxy.example.com:8080/"
NO_PROXY
--env NO_PROXY="localhost,127.0.0.1,.example.com"
为 docker build 过程设置网络代理
在容器构建阶段,如果需要使用 HTTP/HTTPS 代理,可以通过指定 "docker build" 的环境变量,或者在 Dockerfile 中指定环境变量的方式。
使用 "--build-arg" 指定 "docker build" 的相关环境变量
docker build \
    --build-arg "HTTP_PROXY=http://proxy.example.com:8080/" \
    --build-arg "HTTPS_PROXY=http://proxy.example.com:8080/" \
    --build-arg "NO_PROXY=localhost,127.0.0.1,.example.com"
在 Dockerfile 中指定相关环境变量
环境变量
Dockerfile 示例
HTTP_PROXY
ENV HTTP_PROXY="http://proxy.example.com:8080/"
HTTPS_PROXY
ENV HTTPS_PROXY="http://proxy.example.com:8080/"
NO_PROXY
ENV NO_PROXY="localhost,127.0.0.1,.example.com"
debian国内源提示签名错误
Debian改换国内源,apt update 提示签名错误。
可以通过更新debian-archive-keyring解决。
安装新版本debian-archive-keyring
sudo apt-get install debian-archive-keyring
Aws Lightsail root登录启动脚本
创建实例时,如图点击:Add launch script
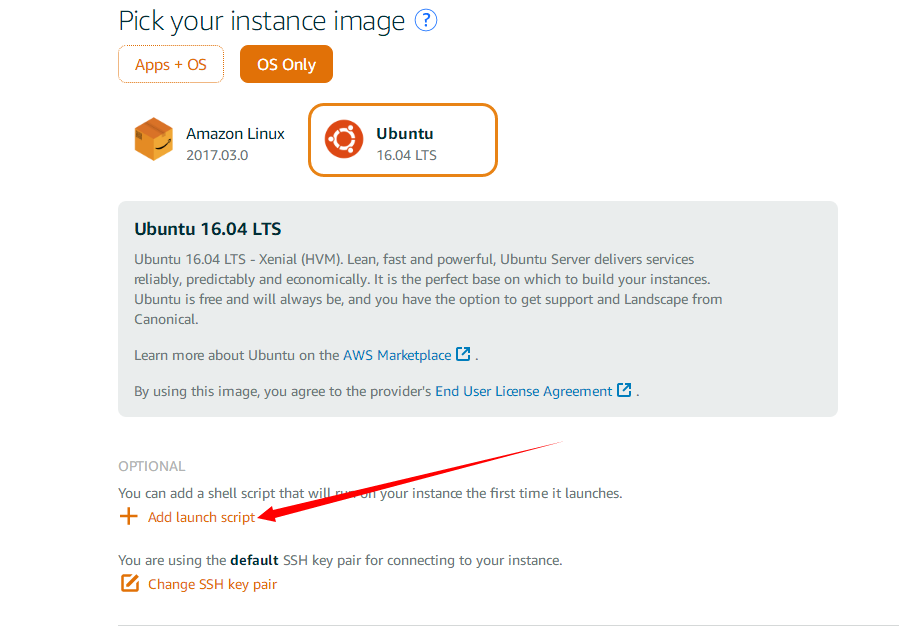
输入脚本代码:
echo root:urpassword |sudo chpasswd root
sudo sed -i 's/^.*PermitRootLogin.*/PermitRootLogin yes/g' /etc/ssh/sshd_config;
sudo sed -i 's/^.*PasswordAuthentication.*/PasswordAuthentication yes/g' /etc/ssh/sshd_config;
sudo reboot
其中 "urpassword" 是你的密码,也可以创建实例登录后用 passwd 命令设置。
解决xshell无法在vim中复制粘贴
ssh xshell 连接在vim中无法用 ctrl+insert 复制黏贴
修改.vimrc
set mouse=c
vi的三种模式:命令模式,插入模式,可视模式.鼠标可以启动于各种模式中:
The mouse can be enabled for different modes:
n Normal mode
v Visual mode
i Insert mode
c Command-line mode
h all previous modes when editing a help file
a all previous modes
r for |hit-enter| and |more-prompt| prompt
Normally you would enable the mouse in all four modes with:
:set mouse=a
When the mouse is not enabled, the GUI will still use the mouse for
modeless selection. This doesn’t move the text cursor.
所以配置文件中的set mouse=a启动了所有模式,这样就屏蔽了鼠标右健功能.
vimrc的存放位置:
系统 vimrc 文件:“$VIM/vimrc”
用户 vimrc 文件: “$HOME/.vimrc”
用户 exrc 文件: “$HOME/.exrc”
系统 gvimrc 文件: “$VIM/gvimrc”
用户 gvimrc 文件: “$HOME/.gvimrc”
系统菜单文件:“$VIMRUNTIME/menu.vim”
$VIM 预设值: “/usr/share/vim”
因为/etc/vimrc和~/.vimrc都要被读取,只是~/.vimrc的优先级高。如果~/下没有.vimrc 直接新建一个就好。
宝塔FTP服务Pure-Ftpd读取目录列表失败的解决方法
宝塔面板在安装了FTP服务“Pure-Ftpd”后,本地使用第三方FTP客户端,提示登录成功,但读取目录列表失败。怀疑是目录权限或端口未开放所致。但经过排查,无论是服务器还是宝塔,都已放行21端口,且目录也出于755权限,均正常。
经过一番探索,发现是Pure-Ftpd开启被动模式后,需要再在服务器放行被动端口。具体方法如下:
- 在宝塔面板左侧选择“安全”面板,放行端口21,同时在服务器端也要相应开放此端口;
-
开放Pure-Ftpd的被动端口,进入服务器端的防火箱设置页面,放行39000-40000的端口;
-
在宝塔面板修改Pure-Ftpd的配置文件。在软件商店找到“Pure-Ftpd”,点击设置。在“配置修改”选项卡中,搜索“ForcePassiveIP”,去掉前面的#号,解除注释。并将后面的IP替换为服务器的外网IP地址。保存配置后,在“服务”选项卡中重载配置即可。
尝试重新登录,看看有什么变化吧!
原文:https://blog.51cto.com/uppower/1404653